The process for installing the theme on Magento Cloud environments where the SCD happens in the Deploy hook of the Deployment process can be found in this article: How to install the Pearl Theme on Magento Commerce Cloud - using UNIX systems
Magento's Ideal State, however, requires the SCD to happen in the Build hook, which proves to be an issue for the Pearl Theme as there is no access to the database in the Build hook, and the LESS/CSS file generation process cannot be completed, causing display issues on the frontend. More info about the Magento Cloud Ideal State can be found in this Magento article: Smart Wizards
We've thus come up with a process of installing the theme so that the LESS/CSS file generation works even when the SCD happens in the Build hook. The process is very similar, however, there are a few key differences.
Step 1. Clone the Cloud repo locally on your UNIX / MAC OS machine or on a server. This installation is not supported via Windows Machines.
git init (initialize git on your local machine)
git config user.name "Support WeltPixel" (add git user)
git config user.email "support@weltpixel.com" (add git email)
eval 'ssh-agent -s'
eval $(ssh-agent -s)
ssh-add '/Users/your_user/.ssh/id_weltpixel_rsa' (add private key associated with the Cloud Account)
ssh-add -l (verify that key was added you should receive '2048 SHA256:......' and the key location)
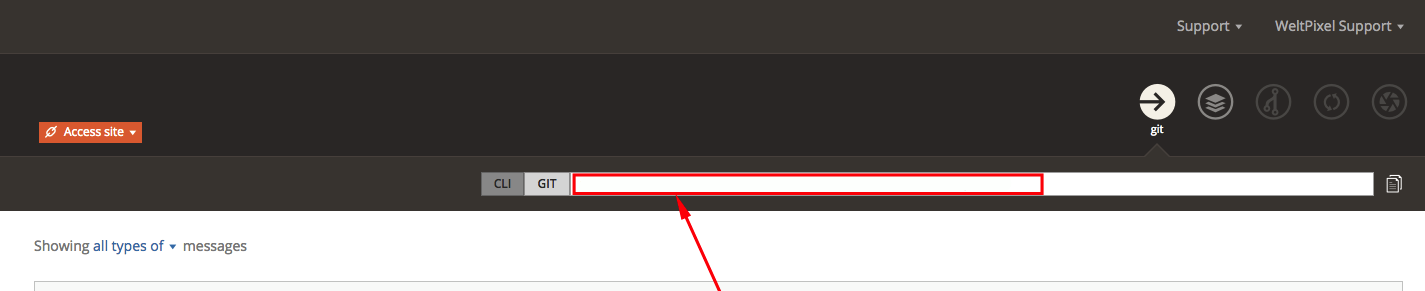
git clone branch_name user@git.us.magento.cloud:repo.git folder_name ( clone your cloud repository, you can find the exact command in your Cloud Account as shown in the picture below)
Step 2. Copy/upload the theme files from the 'Theme Files (Magento Commerce)' folder (only the app and pub folders) in the root of your Magento installation. (If you've only upgraded the theme code to the latest version, it is still necessary to re-apply the latest version of Commerce Cloud Patch as described in Step 3 and Step 4.)
Important: If you are using the Pearl Theme on multiple store views, make sure you follow the instructions in this article before the install/upgrade, as Pearl Theme functionality on the Store-View level has been improved starting with release 1.5.5, October 20, 2017: How to use Pearl Theme on multiple store views. Important update / install instructions. If you have a single store view, you can ignore this note.
Step 3. Copy the content of the ‘Patches/Magento Commerce Cloud patch/Ideal State Environment’ folder into the root of your Magento installation. Make sure to merge with the 'pub' folder and not overwrite it.
After the patch files are copied:
- pearl_cloud_setups.sh and pearl_cloud_local_setups.sh should be in the root of your Magento installation
- pub/media/css_weltpixel should contain the files listed below
![]()
Step 4. Apply the local Commerce Cloud patch
In some cases, you may need to assure scripts are configured with the proper permissions in order to be able to execute them. To do so, run the following command:
chmod +x pearl_cloud_local_setups.sh
Before executing the script, if you have themes (based on Pearl) and/or other locales, you'll need to edit the script and define those. To do so, open it up with your preferred editor and define your themes/locales after line 15.
Note: Do not use commas, as this is a shell script and shell arrays do not use commas.
The weltpixel_custom theme is added by default. After defining your themes/locales, save the file.

On UNIX / MAC OS systems run the pearl_cloud_local_setups.sh script using this command in the CLI in the root of your project, where you copied the files:
./pearl_cloud_local_setups.sh ( sh pearl_cloud_local_setups.sh)
A "DONE" message should show up at the end. Afterward, the pub/media/css_weltpixel folder should contain the following:
![]()
Step 5. Edit the pearl_cloud_setups.sh script to define your themes and/or locales (this step can be skipped if you don't have other themes/locales)
Edit the pearl_cloud_setups.sh script with your preferred editor and define your themes/locales after line 34. The weltpixel_custom theme is added by default. After defining your themes/locales, save the file.

Note! If the static and media paths on the Cloud Server are different from the ones in the default patch file, change them to reflect the correct paths.
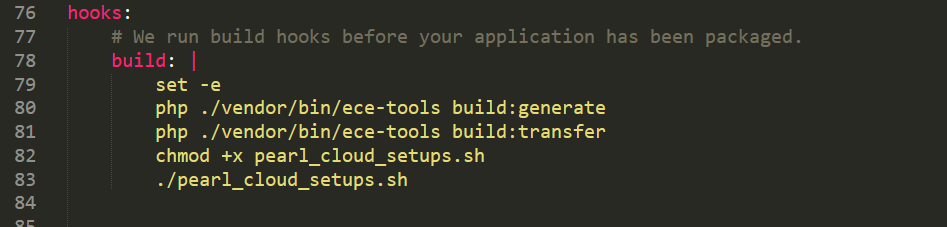
Step 6. Add the pearl_cloud_setups.sh script to be executed during the Build hook of the deployment process
Edit the .magento.app.yaml file included in your project and add the following to the Build hook, after the generate and transfer commands:
chmod +x pearl_cloud_setups.sh (this assures the script can be executed)
./pearl_cloud_setups.sh (this executes the script)
Save the modification. The Commerce Cloud patch will now be applied directly to the Cloud instance and will assure the necessary symlinks are created to be able to run the LESS/CSS generation commands.
Step 7. Add exceptions to your .gitignore file in the root of your Magento installation.
The .gitignore file may be hidden. If you do not see it, activate the option to see hidden files.
6a. Make sure no '*' is present on the first line of your .gitignore file, remove the '*' from the first line of .gitignore file if necessary.
6b. Add the lines below AT THE END of your .gitignore file in order to allow access for media theme files to be committed to your Cloud repository. By adding them at the end you make sure that existing .gitignore settings will not overwrite these exceptions.
!/pub/media/wysiwyg/pearl_theme
!/pub/media/css_weltpixel
!/pub/media/weltpixel
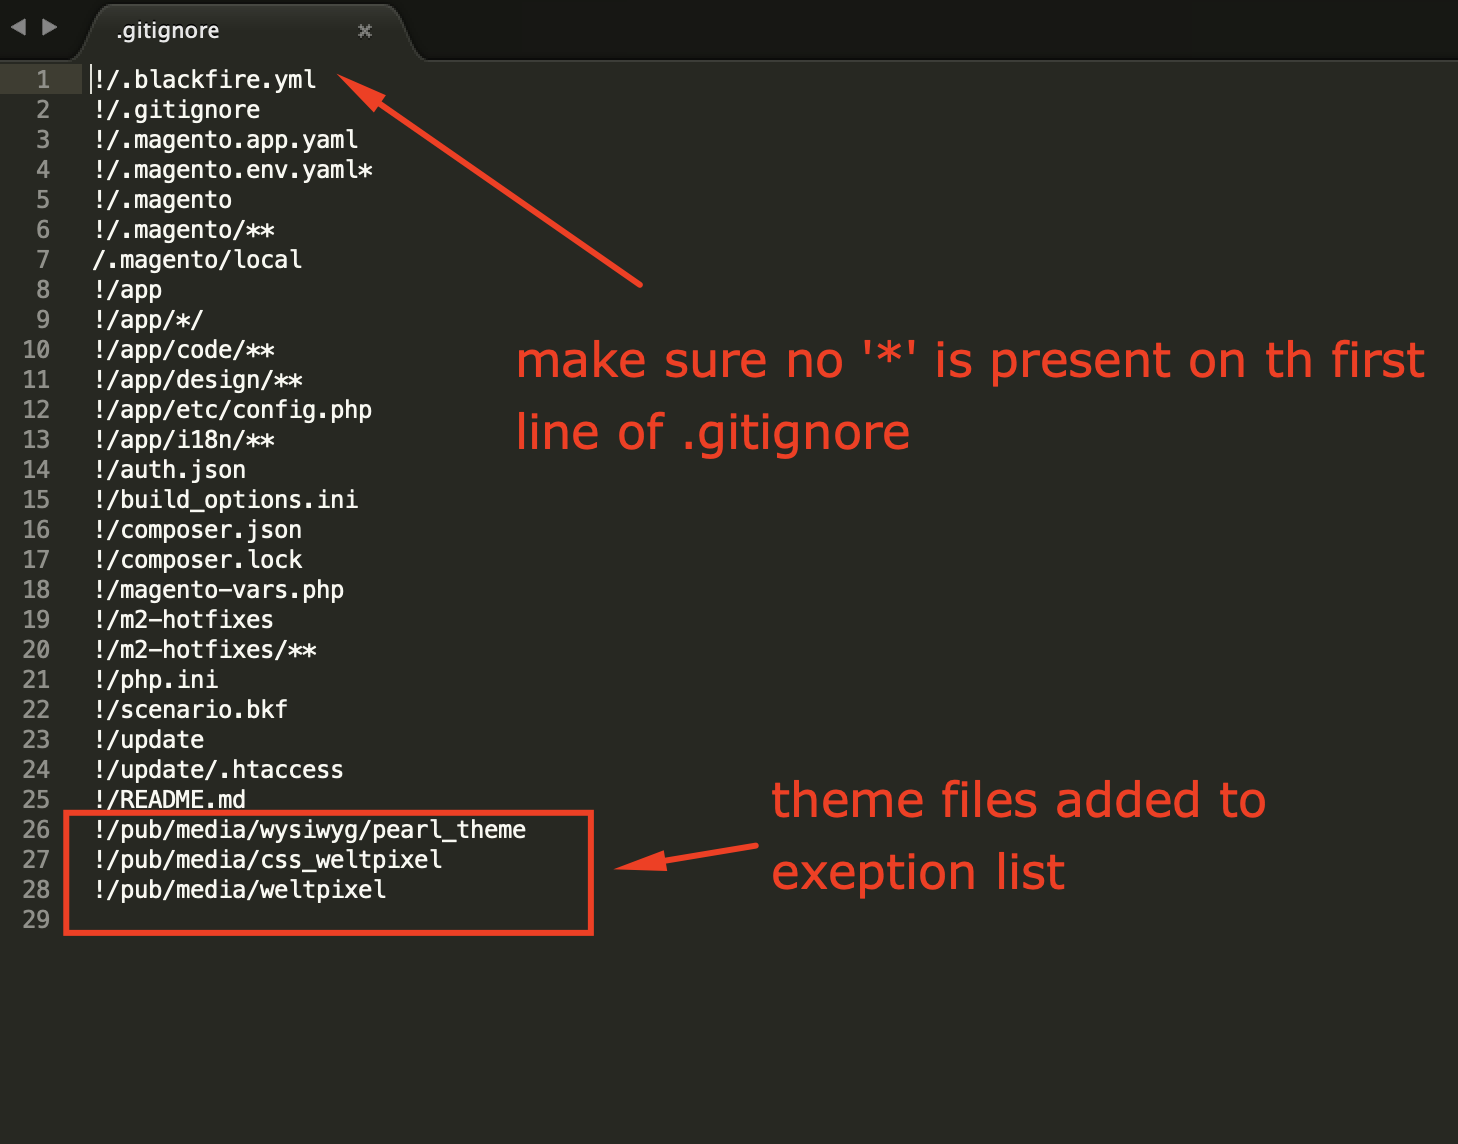
By following the instructions above, you make sure that all theme files are added to your Cloud environment.
Step 8. Commit the changes to your cloud GitHub repository
Go to the root of your Magento installation and run the following commands:
git status (show all new files added to your environment)
git add --all (commit all new files added)
git commit -m "Install Pearl Theme" (commit the files with the installation message)
git branch (verify you are on the correct branch)
git push origin <branch_name> (push the code to your Cloud associated branch)
Step 9. Activate the Pearl Theme
From the Magento Admin :
Go to System > Configuration > (select store view) > Edit > Applied Theme > Custom Pearl Theme for Magento 2
Go to System > Cache Management > Regenerate Pearl Theme LESS/CSS Files
Go to System > Cache Management > Flush Magento Cache
Via SSH: (you can find details on how to connect to Commerce Cloud via SSH at the end of this article)
In the root of the Magento installation execute the commands below:
php bin/magento weltpixel:theme:activate --store="GLOBAL" --themePath="Pearl/weltpixel_custom"
php bin/magento cache:clean
php bin/magento weltpixel:less:generate
php bin/magento weltpixel:css:generate --store=default
If you don't know the admin user or admin path you can use SSH access to create a new user or find the frontend admin path:
- Create new user:
php bin/magento admin:user:create --admin-user='username' --admin-password='password' --admin-email='email@company.com' --admin-firstname='Firstname' --admin-lastname='Lastname'
- Find admin path via /app/etc nano env.php
Step 10. Pearl Theme Pre-Configuration via SSH.
It's important to execute this step in order to generate default values for the Pearl Theme options as a starting point for your project.
Visit the Pearl Theme Demo Store and choose the layout you like for each page type. Available options can be found below:
- [--homePage[="..."]] = v1, v2, v3, v4, v5, v6, v7, v8, v9, v10, v11, v12, v14, v15
- [--header[="..."]] = v1, v2, v3, v4
- [--categoryPage[="..."]] = 2columns, 3columns, 4columns, 5columns
- [--productPage[="..."]] = v1, v2, v3, v4
- [--footer[="..."]] = v1, v2, v3, v4
- [--store="..."] = default, GLOBAL
- [--demoVersion] = v1, v2, v3, v4, v5, v6, v7, v8, v9, v10, v11, v12, v14, v15
When changing between sample Home Pages make sure to run the corresponding import options as each Home Page comes with predefined theme settings.
- php bin/magento weltpixel:import:demo [--store="..."] [--demoVersion]
- php bin/magento weltpixel:theme:configurator [--store="..."] [--homePage[="..."]] [--header[="..."]] [--categoryPage[="..."]] [--productPage[="..."]] [--footer[="..."]]
- php bin/magento weltpixel:less:generate
- php bin/magento weltpixel:css:generate --store=default
- php bin/magento ca:cl
Here's an example for how to set Home Page V10 with the corresponding V10 theme options, Header Version 1, Category Page on 3 columns, Product Page Version 1, Footer Version 3:
- php bin/magento weltpixel:import:demo --store=GLOBAL --demoVersion=v10
- php bin/magento weltpixel:theme:configurator --store=GLOBAL --homePage=v10 --header=v1 --categoryPage=3columns --productPage=v1 --footer=v3
- php bin/magento weltpixel:less:generate
- php bin/magento weltpixel:css:generate --store=default
- php bin/magento ca:cl
Step 11. Automate the Pearl Theme LESS/CSS generation with each deploy
After the deployment, go to the Cache Management section of your Magento Admin and Regenerate Pearl Theme LESS/CSS files in order to correctly apply all theme options.
You can automate the Pearl Theme LESS/CSS generation by adding the corresponding commands in the .magento.app.yaml file from the root of your cloud installation, these commands will automatically be executed with each deploy. You can find an example of the deploy hook structure of the .magento.app.yaml file below.
hooks:
# We run build hooks before your application has been packaged.
build: |
php ./vendor/bin/ece-tools build:generate
php ./vendor/bin/ece-tools build:transfer
chmod +x pearl_cloud_setups.sh
./pearl_cloud_setups.sh
# We run deploy hook after your application has been deployed and started.
deploy: |
php ./vendor/bin/ece-tools deploy
# We run post deploy hook to clean and warm the cache. Available with ECE-Tools 2002.0.10.
post_deploy: |
php ./vendor/bin/ece-tools post-deploy
php ./bin/magento weltpixel:less:generate
php ./bin/magento weltpixel:css:generate --store=default
***
DONE. The Pearl Theme is now installed on your Magento Commerce Cloud Environment
***
Comments
0 comments
Please sign in to leave a comment.